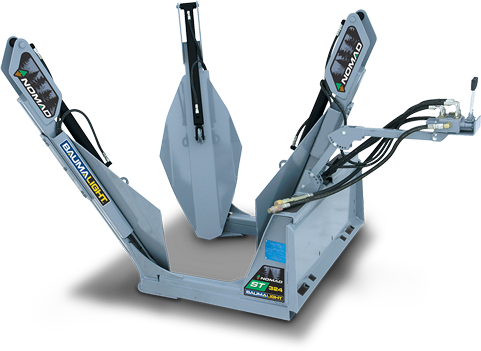
This fixed frame hydraulic tree spade is ideal for smaller skidsteers. The ST324 Small Fixed Compact tree spade features three blades to give you the digging and root ball compacting action necessary for cleaner and more viable transplants.
There are currently no customer photos or video submitted for this Baumalight product.Please check out similar products to see if there are submitted media available for those . Visit our Factory Discount web page to learn how you could participate in our Media Discount Program with your Baumalight product.

| Model |  |
 |
 |
 |
 |
|---|---|---|---|---|---|
| Standard mount | Universal skidsteer | Universal skidsteer | Universal skidsteer | Universal skidsteer Warning |
Universal skidsteer |
| Extension kit | Check | Check | Check | Check | Not needed |
| Tree Size (Evergreen) | 3" | 3" | 3" | 4" | 5" |
| Tree Size (Hardwood) | 1.5" | 2.5" | 2.5" | 3" | 4" |
| Root Ball Diameter | 24" | 30" | 30" | 40" | 50" |
| Root Ball Depth | 23" | 29" | 29" | 30" | 43" |
| Opening (Width) | 20" | 23" | 60" | 52" | 47" |
| Blade Angle (Degrees) | 25° | 25° | 25° | 25° | 25° |
| Number of Blades | 3 | 3 | 3 | 4 | 6 |
| Blade Thickness | 1/4" Mild Steel | 3/8" Mild Steel | 3/8" Mild Steel | 1/4" AR400 | 1/4" AR400 |
| Slides | Steel | Steel | Steel | Steel | Steel |
| Blade Truncation | Semi | Semi | Semi | Full | Semi |
| Towers Swing Hinge | No | No | Yes | Yes | Yes |
| Hydraulic Flow | 5-20 (GPM) | 5-20 (GPM) | 5-20 (GPM) | 5-20 (GPM) | 5-20 (GPM) |
| Hydraulic Pressure | 2900-4000 (PSI) | 2900-4000 (PSI) | 2900-4000 (PSI) | 2900-4000 (PSI) | 2900-4000 (PSI) |
| Weight | 1100 | 1356 | 1550 | 1934 | 3238 |
| Weight with Root Ball | 1400 | 1865 | 2050 | 3134 | 5785 |
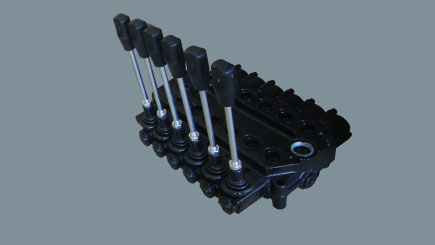
With multiple choices available, the Controls line from Baumalight gives you both the power and freedom to control your tree spade. Whether you choose a fixed manual control solution, wired, wireless or AUX Baumalight has you covered. We also can custom connect to your existing electrical plug on your boom to connect to your build in cab controls.
Manual hydraulic valves with a dual position mounting stand.
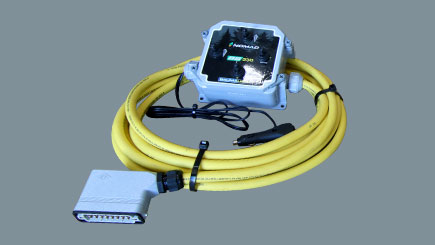
Control all the digging and swinging actions from the seat of your carrier with hand held remote control using the power of your 12 volt plug.
For the ultimate in convenience, the wireless controller option gives you the ability to move freely around the spading operation for the most precise insertion and extraction points available.
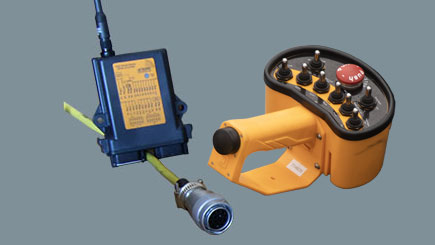
Baumalight now offers a more direct and simple way of connecting to your skidsteer’s auxiliary electrical connection. Simply connect the hydraulics and plug in the electrical. Now you can control the attachment from inside your cab.
See video on how AUX operation works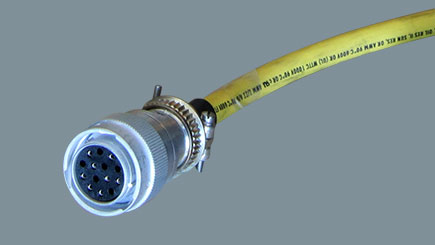
| Model | For Use With | Connection Type | Required Live Pins |
|---|---|---|---|
| D003427 | ST324 & ST330 | AUX | Live-2 |
| D003428 | SS330 | AUX | Live-3 |
| D003429 | ST440, DR434, DR438, DR444 & DR448 | AUX | Live-5 |
| D003449 | ST650 | AUX | Live-7 |
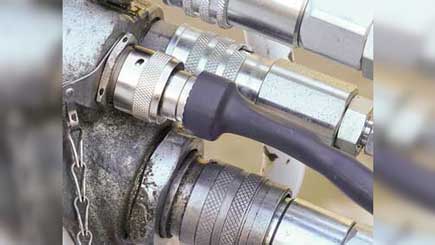
D006408 : Bobcat 7-pin CANBUS plug for two directional valves or four selector valves.
View Photo
Note: D006386, D006408 & D007070 Greentronics controllers are incompatible with Bobcat Telehandlers.
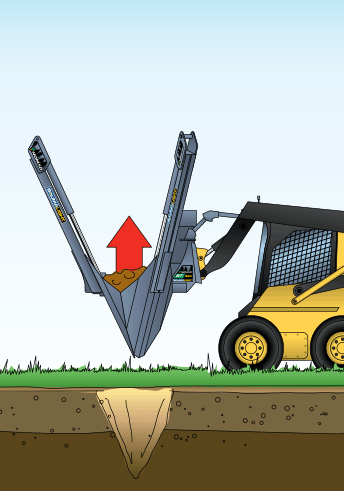
Find the new location for your tree. Position the spade at a defined direction, say North. Engage blades and scoop your hole.
Align the spade with the tree in the same direction chosen for the hole—in this case, North.
Open blade, move forward to position tree in the center of the dig area. Engage blades until they meet.
Lift the tree up and transport to the new hole. Note: In harder earth, the spades may cause glazing on the hole walls. Before the new tree is placed, this surface needs scuffing in order for the new roots to penetrate.

Align the shaft with the orientation of the new hole. Lower and position the tree Note: Trees become more tolerant of hot afternoon sun on one side. Changing their orientation can burn the foliage.
Trees can be planted any time of year, watering becomes more important if moved in a dry season. Although moving trees in the spring or fall has previously been seen as the optimal time, this is only because it is typically cooler and wetter during these times. When moving a tree outside of this, simply be sure the tree is well watered for several days before hand.
Make sure the trees are well watered 2-3 days before moving.
Mark the trees orientation so it may be transplanted in the same direction reducing the risk of sunscalding.
Secure any low hanging branches that may be damaged during transplant.
The trunk size helps estimate the size of the root ball underground, as roots typically extend as far as the tree's branches. For softwood trees, it is generally acceptable to trim about half of the roots. Increased watering may be necessary when moving softwoods larger than recommended and selecting shady or moist locations will also help insure survivability when trimming large amounts of root. In contrast, for hardwood trees, only about one-third of the roots should be trimmed, as they are more sensitive to root loss and excessive watering will only lower chances of survival.
Location - find a suitable location that meets the environmental requirements of the specimen.
Create the hole in which the specimen will be relocated.
Prepare the hole based on the soil condition. If the soil has a large clay content rough up the sides for easier root penetration. If the soil is sandy add appropriate nourishment, and if the soil is dry water the hole.
Keep well watered to help establish roots.
Apply mechanical supports if required to help stabilize the tree for one to two years while the specimen re-establishes.
Keep your tree spade in good operating condition and wellmaintained. Sharp blades will reduce damage to root systems.
Try to replant your specimen within two hours. This will help reduce shock.
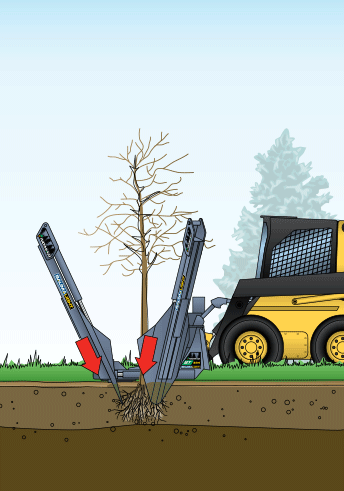
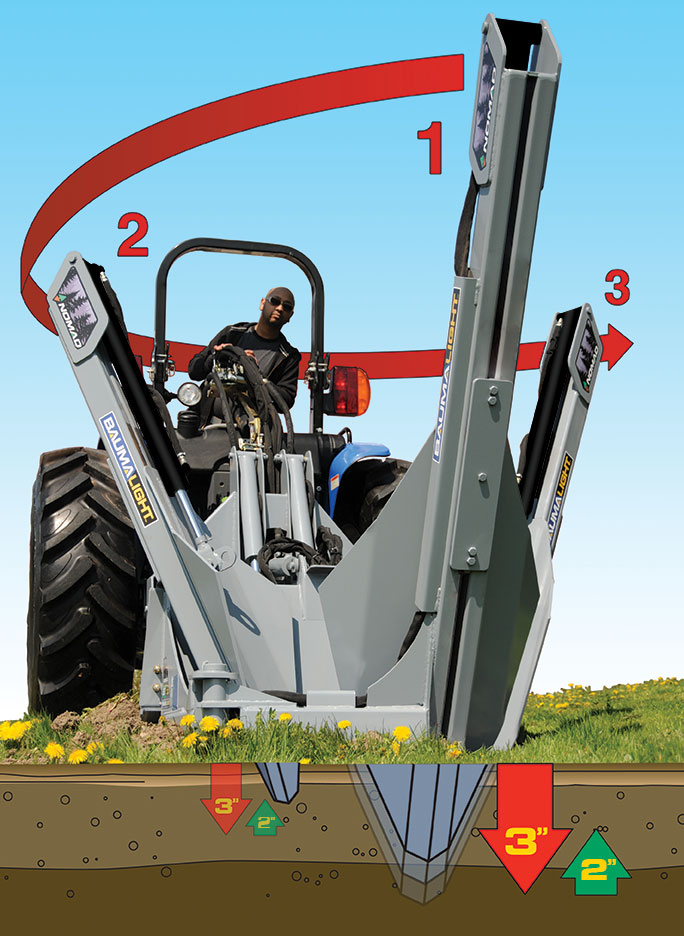
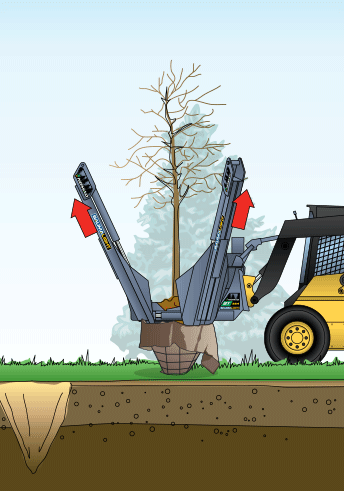
Position the tree spade around the tree to be moved ensuring it is resting on the ground and that the spades are spaced evenly around the tree. Failure to accurately position the spade may result in unnecessary trauma to the tree.
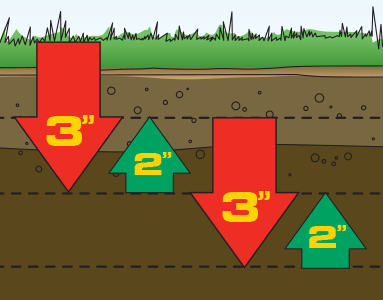
Dig in with each spade 3 inches down then 2 inches back until frame rests on ground. Move to the next spade working around the tree. This keeps the spades aligned with less disruption to the roots and keeps the tree straight. Keep working the spades in until they are fully extended.
Note: Frame must remain on ground or root ball size will be decreased.
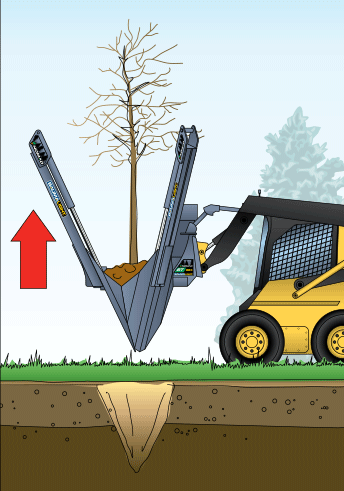
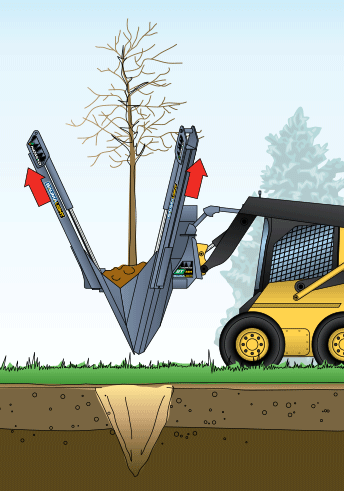
When all spades are fully extended, wiggle the root ball in the hole slightly increasing the pocket sides and releasing additional root mass. Raise the unit, lifting the tree out of the hole. Depending on the extent of the root growth some manual root pruning may be required to free the tree.
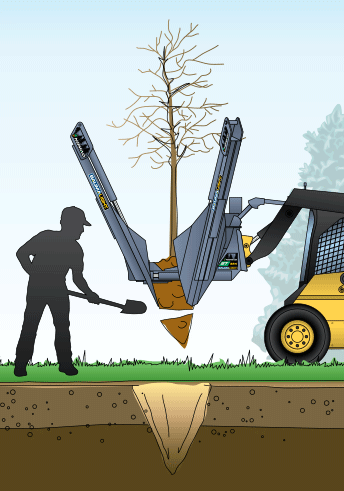
Place the tree in the hole and reverse the process by raising the spades around the tree a little at a time until the tree is resting comfortably in its new home.
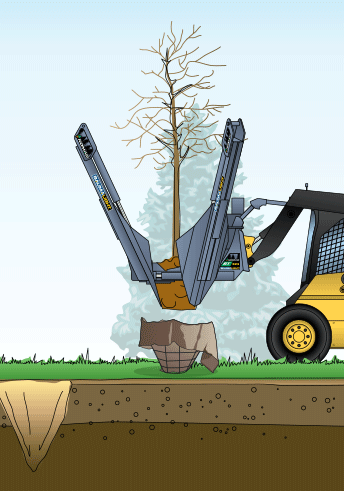
Prepare root ball.
Flatten root ball for stability. Retract the spades a little at a time in a circular motion, until approx. 6" of the root ball is exposed below spades. Using a shovel remove the excess and flatten the root ball.
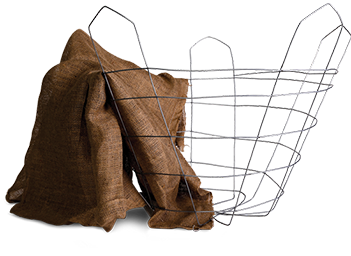
Get basket ready.
Place your burlap liner in the wire basket and place the basket on level ground.
Place in Basket
Line up the root ball with basket and lower into place. Retract the spades fully, until root ball is resting in basket. Remove the tree spade leaving tree in basket.
Tie tree in place.
Fold in burlap and basket and tie tree into place.


| MODEL | DISCOUNT | CATEGORY | LOCATION | DESCRIPTION |
|---|
PRODUCT DETAILS
PRE-PRODUCTION TESTING
Test our pre-production and prototype models for deep discounts by giving us all the necessary feedback to make sure these models meet the requirements demanded in the field. No Warranty can be provided on labour but you'll receive deep discounts through our dealer network as well as a 1 year warranty on parts* only. Baumalight understands this is not for everyone, but our discount program offers many benefits and we look forward to providing full warranty versions in the future once all product testing has been completed.
*Warranty labour must be performed by end user with no further compensation other than the deep discount off the original purchase price.
MEDIA
With any purchase from the following list you'll have the opportunity to work with our marketing agency to obtain photos and video footage for additional discounts or if you are located farther away we give a lesser discount for high definition pictures and video footage as well.
DEMO/FLOOR MODELS
Be sure to inquire about our many showroom
floor,light
demonstrator and discounted models
with available deep discounts.
| Date | Description |
|---|
| Model Number | Discount Available | Lead time to build first order | Lead time to build next order | Location | Notes | Discount Description |
|---|
| Model Number | Discount Available | Lead time to build first order | Lead time to build next order | Location | Notes | Discount Description |
|---|
| Date | Description |
|---|